Last month, Google deployed a new feature in Gmail which automatically categorizes your emails as social, promotions, updates, and forums. I find it annoying extra clutter. It provides no value to me. It's catagorizations are usually wrong. It smacks of Big Brother. And there is no button to turn it off.
After a month of ignoring it, I started searching. I found an easy solution. It's a one-time task. Create a filter which captures all your email, and set the category to 'personal'. Be sure to check the box to apply the filter to all existing emails too. Then wait. Mine took about 15 seconds to update all my archived emails.
The complete instructions were posted by wdurham on June 2 at the bottom of this page:
http://productforums.google.com/forum/#!topic/gmail/MDWXUKCHrPw%5B1-25-false%5D
All my current emails are now un-categorized, future emails will not be categorized, and the extra clutter is gone. Thanks wdurham.
Sunday, June 30, 2013
Friday, June 28, 2013
Remote Desktop on Linux
I *finally* discovered a quick, easy, and reliable way to access the desktop of remote linux machines. It's called XRDP.
I've been using linux laptops exclusively since 2001. And most of my desktop and server machines have been linux since years before that. But for various reasons, I have never found a good way to access the desktop GUI view remotely. SSH command-line is my friend, but sometimes you just need a good GUI. I finally found it.
And it works with Ubuntu linux servers presenting either the good-old gnome desktop (ie gnome-session-fallback) or Unity.
Here's what I did...
On the server: xrdp
On the client: remmina
Server-side
sudo apt-get -y install xrdp
Client-side
Applications-> Internet-> Remmina Remote Desktop Client
Connection-> New->
Name: <your server's name, nickname, or whatever you like>
Protocol: RDP Remote Desktop Protocol
Server: <your server hostname or IP>
User Name: <account user name on your server>
Password: <******>
Save
Double-click the connection. It connects. Say yay.
If you prefer the gnome desktop (instead of Unity), and have already installed gnome-session-fallback on your server machine, you can access it using xrdp and remmina with one easy tweak...
On the server machine, sign-in as your user account (ie, not root), open a command-prompt, go to your home directory, and create a new hidden file named .xsession
/home/username> echo "gnome-session --session=gnome-fallback" > .xsession
The next time you connect to the GUI desktop using Remmina, you will get the gnome desktop.
To revert, simply delete file /home/username/.xsession
To speed up repaint performance over slow internet connections, I switch the server desktop background from a pretty image to single color.
On the server machine, right-click the desktop background-> tab Appearance-> dropdown Colors & Gradients-> Click the solid color block (no gradients)-> then select a pleasing color.
I like a remote desktop window to be smaller than my screen size, so that I can see other windows and navigate easily.
On your linux client machine, in the Remmina app, right-click the connection-> Edit
Resolution-> Custom-> dropdown select a resolution that fits.
In the same dialog, you can also tweak the colors to look better.
Try it.
I've been using linux laptops exclusively since 2001. And most of my desktop and server machines have been linux since years before that. But for various reasons, I have never found a good way to access the desktop GUI view remotely. SSH command-line is my friend, but sometimes you just need a good GUI. I finally found it.
And it works with Ubuntu linux servers presenting either the good-old gnome desktop (ie gnome-session-fallback) or Unity.
Here's what I did...
Summary
On both machines: Ubuntu 12.04On the server: xrdp
On the client: remmina
Minimum Setup
Server-side
sudo apt-get -y install xrdp
Client-side
Applications-> Internet-> Remmina Remote Desktop Client
Connection-> New->
Name: <your server's name, nickname, or whatever you like>
Protocol: RDP Remote Desktop Protocol
Server: <your server hostname or IP>
User Name: <account user name on your server>
Password: <******>
Save
Double-click the connection. It connects. Say yay.
Server-side Tweaks
If you prefer the gnome desktop (instead of Unity), and have already installed gnome-session-fallback on your server machine, you can access it using xrdp and remmina with one easy tweak...
On the server machine, sign-in as your user account (ie, not root), open a command-prompt, go to your home directory, and create a new hidden file named .xsession
/home/username> echo "gnome-session --session=gnome-fallback" > .xsession
The next time you connect to the GUI desktop using Remmina, you will get the gnome desktop.
To revert, simply delete file /home/username/.xsession
To speed up repaint performance over slow internet connections, I switch the server desktop background from a pretty image to single color.
On the server machine, right-click the desktop background-> tab Appearance-> dropdown Colors & Gradients-> Click the solid color block (no gradients)-> then select a pleasing color.
Client-side Tweaks
I like a remote desktop window to be smaller than my screen size, so that I can see other windows and navigate easily.
On your linux client machine, in the Remmina app, right-click the connection-> Edit
Resolution-> Custom-> dropdown select a resolution that fits.
In the same dialog, you can also tweak the colors to look better.
Bonus
The XRDP service on the linux servers can also be accessed well from Windows clients (using the Microsoft Remote Desktop client), and Mac clients (using Microsoft's Remote Desktop Connection Client for Mac).Try it.
Tuesday, December 11, 2012
How to plot points on a map using Google Fusion Tables
This is an introductory tutorial on how to plot points on an online map using Google's experimental Fusion Tables service.
To illustrate the procedure, I will plot some real data. Some friends of mine recently hosted a fun bicycling contest called the 'Coffeeneuring Challenge'. The contest is over, the results are in, and I plotted the name of each participant on a map, along with their location, and a link to their blog if available. This article explains how I did it.
This tutorial is presented in two parts. This first very basic section will create a CSV file, upload it to Fusion Tables, tweak a group of settings, and publish a URL Link. The second section will enhance the map to make it more useful.
Prereqs
You need a Google account in order to use the Fusion Table service.Part 1. Basic Map
Create CSV file
The results of the bicycling contest were published here: http://chasingmailboxes.com/2012/12/06/coffeeneuring-challenge-winners-and-honorable-mentions/
I scrolled down about halfway through the story and found the list of participants. For my first experiment, I started with the first three participants from the list:
Bill A. the ultimate coffeeneur. Portland, Oregon*
Crystal B. Aesthetics of Everywhere. (team with Adam) Washington, D.C.
Dan B. Pittsburgh, Pennsylvania
I manually created a CSV file on my computer using a text editor, and rearranged excerpts of the data to look like this:
Name, Location
"Bill A.", "Portland, OR"
"Crystal B.", "Washington, DC"
"Dan B.", "Pittsburgh, PA"
Then I removed all extra whitespace in the file (except that between quotes) and saved it on my computer.
Name,Location
"Bill A.","Portland, OR"
"Crystal B.","Washington, DC"
"Dan B.","Pittsburgh, PA"
To recreate my map, you should create a file with the same contents.
Create Fusion Table
Next, start your browser, go here: https://drive.google.com/ and sign in with your Google account. In the upper left, click the red button 'Create' -> More -> Fusion Table (experimental).

Click 'Choose File', navigate to your CSV file and upload it. Click ok-> Next-> Finish.

Your data will now appear in a Fusion Table:

Let's change the settings of the 'Locations' column from being interpreted as text to being interpretated as a map location. Click the small pulldown arrow adjacent to 'Locations'-> Change-> Type-> Location. Wait a minute for it to complete.

Add a map to the table.
Click the small plus sign adjacent to tab 'Cards 1'-> Add Map

Wait a minute, and the new map appears. Notice that there are three small red dots on the map, corresponding to the three cities listed in our CSV file.

Say yay. We created a map.
Tweak: Let's make the points more visible. Click the small pulldown arrow adjacent to tab 'Map 1'-> Change map styles -> select large blue icon-> Save. Wait for the map to refresh. Much nicer.

Publish the map. This takes several steps to make the map public and then get the URL link.
Click the pulldown arrow adjacent to tab 'Map 1' again-> Publish

Click 'Change Visibility'

At 'Who has access', click 'Change'

Click 'Public on the web'-> Save

Save the URL link which now appears. This link can be shared with others.

Test: Start another browser window and go to that URL. You will see a nice map. Viewers can scroll around and click on the placemarks, but they can't edit it. Cool.
Part 2. Enhanced Map
Shortly after I started this tutorial, I realized that the bicycling contest has more than one participant in some cities. That means my original data organization won't work. So let's swizzle the data a little and try again.
While we are at it, let's show points for more participants, and let's add the URL to the participants' blogs...
Delete the first map
It seems like a waste to delete what we just created, but this is an imprtant skill. You need to know how to delete maps. Browse to http://drive.google.com Find your CSV file in the list. Check the checkbox, then click the trash can icon up top. Gone.
Create another CSV file
This time, let's organize the data with the location column first, followed by a list of all the participant names for that city. On the top header row, create columns for eight names and URLs. These will hold the names and URLs of each participant in that city. If there are fewer participants than eight, those columns can stay empty. Let's add data for several participants...
Location,name0,url0,name1,url1,name2,url2,name3,url3,name4,url4,name5,url5,name6,url6,name7,url7
"Wilmington, DE","Patti B.",http://chasingmailboxes.com/2012/11/20/pattis-coffeeneuring-rewind-delaware-coffeeneuring-with-a-side-of-trail-running/
"Wheaton, MD","Simon B."
"Washington, DC","Kate C.",http://girlonabicycle.blogspot.com/search?q=coffeeneuring&max-results=20&by-date=true,"Kirstin C",http://ultrarunnergirl.blogspot.com/p/coffeeneuring-challenge.html,"Tom C"
Save the file and upload to Fusion Tables as we did before.
View the map, click on Washington DC placemark, and we see the three names and two URL links. Yay.

But this pop-up is ugly. Let's see if we can make it a little prettier...
Google Fusion Tables lets us define HTML snippets in a field called the 'Info Window'. This lets us control how the data is presented from each column of the CSV file onto the map. Manually create a simple HTML file on your computer, and paste-in the following text. Note the values between curly braces: Fusion Tables substitutes data from the named columns into these values.
<div class='googft-info-window' style='font-family: sans-serif'>
<b>{Location}</b><br>
<table>
<tr>
<td>{name0} <a href="{url0}" target="_blank">{url0}</a></td>
</tr>
<tr>
<td>{name1} <a href="{url1}" target="_blank">{url1}</a></td>
</tr>
<tr>
<td>{name2} <a href="{url2}" target="_blank">{url2}</a></td>
</tr>
<tr>
<td>{name3} <a href="{url3}" target="_blank">{url3}</a></td>
</tr>
<tr>
<td>{name4} <a href="{url4}" target="_blank">{url4}</a></td>
</tr>
<tr>
<td>{name5} <a href="{url5}" target="_blank">{url5}</a></td>
</tr>
<tr>
<td>{name6} <a href="{url6}" target="_blank">{url6}</a></td>
</tr>
<tr>
<td>{name7} <a href="{url7}" target="_blank">{url7}</a></td>
</tr>
</table>
</div>
Copy/paste the contents of this file to Fusion Tables. (Note: we don't upload this file, we just copy/paste the contents. The file is kept on our computer for safe-keeping.) Click on the tiny pulldown arrow adjacent to the map tab-> 'Change info window layout'

Click 'custom'-> delete all existing text, then paste-in our new text-> Save.

View the map, click on Washington DC again, and see the nice formatting. Say Yay again.

You're almost done.
Now that we know this technique works, we can finish copying the raw results data from the coffeeneuring results website to your CSV file. I did that for the total 51 participants in the Coffeeneuring contest. Then I uploaded the file again, did the optional tweaks, and set publish visibility to public, and shared the URL.
Here is my final map:
Long URL link: https://www.google.com/fusiontables/embedviz?viz=MAP&q=select+col0+from+1k8MIhiPN64k1CJ8lafFZ8KfDIrXCwJBQ7z0dGU8&h=false&lat=36.12012758978151&lng=-60.97412109375&z=3&t=1&l=col0&y=2&tmplt=2
Shortened link: http://goo.gl/m6BXq
What's next?
Ramp it up. For real mapping projects, you probably don't want to type the data manually like I did here. Write a program to automatically extract data from your source (perhaps from a database) and format it into a CSV file.
Create a static web page to reference your map. Google Fusion Tables seems to change the URL link to maps at random intervals. When that happens, the new link must sent to all viewers. This is a pain for everyone involved. Instead, I maintain a static web page whose URL does not change, and I hide the ever-changing link to the map on this page.
Fancy pop-ups. The text and URL links in the pop-ups in this article are pretty rudimentary. Figure out how to use fancy javascript in the info window HTML and make it look really nice.
Conclusion
Congrats. You are now an accomplished user of Google Fusion Tables. Impress your friends!
Thursday, July 5, 2012
Using Git and Github for small project collaboration
Way too many words have been written about git.
So here are some really terse notes to create a git project and share it at github.com.
Many references are listed at bottom.
Step 1 of 8. Github Account Setup
Prereqs
Select
github username: eg sag
github password: xxxx
email to be used with github account: sag@sag.com
Generate SSH public & private keys on your laptop
ssh-keygen -t rsa -C "sag@sag.com"
Specify filename when prompted: sag.id_rsa
Specify credentials for github in SSH config file ~/.ssh/config
Host github.com
User sag
IdentityFile ~/.ssh/sag.id_rsa
Create free Github account
http://github.com-> Plans, Pricing, and Signup-> Create a free account->
username sag
email sag@sag.com
password xxxx
password xxxx
create
Add SSH public key to github account
cat ~/.ssh/sag.id_rsa.pub
copy to clipboard
http://github.com-> sign in-> Account Settings-> SSH Keys-> Add SSH Key
paste into 'key' textbox
enter github password xxxx
Confirm ssh auth to github
ssh git@github.com
PTY allocation request failed on channel 0
Hi sag! You've successfully authenticated, but GitHub does not provide shell access.
Connection to github.com closed.
Step 2 of 8. Create Local Project on Laptop
Prereqs
Install git on your laptop
Optional: Configure git globally
git config –global user.name sag
git config –global user.email sag@sag.com
Verify:
cat ~/.gitconfig
Create directory for new project on laptop
mkdir testproj
cd testproj/
Create local git repository
git init
Inspect repository in directory testproj/.git
Optional: Configure git locally
git config user.name sag
git config user.email sag@sag.com
Verify:
cat .git/config
Create some files
echo "file1" > file1.txt
echo "file2" > file2.txt
echo "file3" > file3.txt
Track the files under git
git add file1.txt
git add file2.txt
git add file3.txt
Query status
git status
# On branch master
#
# Initial commit
#
# Changes to be committed:
# (use "git rm --cached <file>..." to unstage)
#
# new file: file1.txt
# new file: file2.txt
# new file: file3.txt
#
Commit the changes to the local repository, master branch
git commit -m "First commit."
[master (root-commit) 15a975d] First commit.
3 files changed, 3 insertions(+), 0 deletions(-)
create mode 100644 file1.txt
create mode 100644 file2.txt
create mode 100644 file3.txt
Query status
git status
# On branch master
nothing to commit (working directory clean)
Change one file, create another
echo "blob" >> file1.txt
echo "file4" > file4.txt
git add file4.txt
Query status
git status
# On branch master
# Changes to be committed:
# (use "git reset HEAD <file>..." to unstage)
#
# new file: file4.txt
#
# Changed but not updated:
# (use "git add <file>..." to update what will be committed)
# (use "git checkout -- <file>..." to discard changes in working directory)
#
# modified: file1.txt
#
Commit the changes to the local repository, master branch
git commit -m "Commit 2."
[master aa8a791] Commit 2.
1 files changed, 1 insertions(+), 0 deletions(-)
create mode 100644 file4.txt
Step 3 of 8. Local Branch - Simple Changes
Note: default branch is named 'master'
Ensure no current changes
git status
# On branch master
Query current branch
git branch
* master
Create new branch, equivalent to master branch
git branch br1
Change local working directory to new branch
git checkout br1
Switched to branch 'br1'
Confirm
git branch
* br1
master
Change some code
rm file4.txt
git rm file4.txt
echo "blob" >> file3.txt
git add file3.txt
echo "file0" > file0.txt
git add file0.txt
Query status
git status
# On branch br1
# Changes to be committed:
# (use "git reset HEAD <file>..." to unstage)
#
# new file: file0.txt
# modified: file3.txt
# deleted: file4.txt
Commit to branch br1
git commit -m "First commit to br1."
Query differences between current branch br1 and master
git diff master
diff --git a/file0.txt b/file0.txt
new file mode 100644
index 0000000..dc3ab4a
--- /dev/null
+++ b/file0.txt
@@ -0,0 +1 @@
+file0
diff --git a/file3.txt b/file3.txt
index 7c8ac2f..128c6e3 100644
--- a/file3.txt
+++ b/file3.txt
@@ -1 +1,2 @@
file3
+blob
diff --git a/file4.txt b/file4.txt
deleted file mode 100644
index bfd6a65..0000000
--- a/file4.txt
+++ /dev/null
@@ -1 +0,0 @@
-file4
Confirm
ls
file0.txt file1.txt file2.txt file3.txt
Go to branch master
git checkout master
Switched to branch 'master'
Confirm
ls
file1.txt file2.txt file3.txt file4.txt
Merge from branch br1 to branch master
git merge br1
Updating 8147115..0d36824
Fast-forward
file0.txt | 1 +
file3.txt | 1 +
file4.txt | 1 -
3 files changed, 2 insertions(+), 1 deletions(-)
create mode 100644 file0.txt
delete mode 100644 file4.txt
Confirm
ls
file0.txt file1.txt file2.txt file3.txt
git status
# On branch master
nothing to commit (working directory clean)
Delete br1
git branch -d br1
Deleted branch br1 (was 0d36824).
Confirm
git branch
* master
Step 4 of 8. Local Branch - Diff Collisions
Create new branch equivalent to master branch
git branch br2
Confirm still in branch master
git branch
br2
* master
Change file in branch master
echo "change in branch master" >> file0.txt
git add file0.txt
git commit -m "master changed file0"
[master c3ac14c] master changed file0
1 files changed, 1 insertions(+), 0 deletions(-)
Confirm
git status
# On branch master
nothing to commit (working directory clean)
cat file0.txt
file0
change in branch master
Change to branch br2
git checkout br2
Switched to branch 'br2'
Confirm
cat file0.txt
file0
Change same file in br2 (intentional collision)
echo "change in branch br2" >> file0.txt
git add file0.txt
git commit -m "br2 changed file0"
[br2 6717435] br2 changed file0
1 files changed, 1 insertions(+), 0 deletions(-)
Confirm
git status
# On branch br2
nothing to commit (working directory clean)
cat file0.txt
file0
change in branch br2
Query differences between current branch br1 and master
git diff master
diff --git a/file0.txt b/file0.txt
index c661097..3b65600 100644
--- a/file0.txt
+++ b/file0.txt
@@ -1,2 +1,2 @@
file0
-change in branch master
+change in branch br2
Go to branch master
git checkout master
Switched to branch 'master'
Confirm
ls
file1.txt file2.txt file3.txt file4.txt
Merge from branch br1 to branch master
git merge br1
Confirm
cat file0.txt
file0
change in branch master
Fail to do a simple merge
git merge br2
Auto-merging file0.txt
CONFLICT (content): Merge conflict in file0.txt
Automatic merge failed; fix conflicts and then commit the result.
Confirm
git status
# On branch master
# Unmerged paths:
# (use "git add/rm <file>..." as appropriate to mark resolution)
#
# both modified: file0.txt
#
no changes added to commit (use "git add" and/or "git commit -a")
Inspect changes written by git to local repository, master branch
cat file0.txt
file0
<<<<<<< HEAD
change in branch master
=======
change in branch br2
>>>>>>> br2
Resolve differences
Manually edit file0.txt
git commit -m "resolved changes from br2"
[master db14e1a] resolved changes from br2
Confirm
git status
# On branch master
nothing to commit (working directory clean)
cat file0.txt
file0
change in branch master and in branch br2
Step 5 of 8. Create Remote Repository at Github
Prereq
Confirm you still have SSH auth to access Github
ssh git@github.com
PTY allocation request failed on channel 0
Hi sag! You've successfully authenticated, but GitHub does not provide shell access.
Connection to github.com closed.
Create a repository at github
http://github.com-> sign in-> Create a new repo (tiny icon in upper-right)
name: testproj
select: public
uncheck: create README
click button 'Create'
Configure the local project to access the new github repository
(Note I specify the name 'github' for the remote, rather than default 'origin'.)
git remote add github git@github.com:sag/testproj.git
Confirm
git remote -v
github git@github.com:sag/testproj.git (fetch)
github git@github.com:sag/testproj.git ( )
cat .git/config
[remote "github"]
url = git@github.com:sag/testproj.git
fetch = +refs/heads/*:refs/remotes/github/*
Upload the local project to the new github repository
git push -u github master
Counting objects: 27, done.
Delta compression using up to 2 threads.
Compressing objects: 100% (16/16), done.
Writing objects: 100% (27/27), 2.31 KiB, done.
Total 27 (delta 2), reused 0 (delta 0)
To git@github.com:sag/testproj.git
* [new branch] master -> master
Branch master set up to track remote branch master from github.
Confirm
http://github.com-> sign in-> Repositories-> testproj-> tab Files-> see list of files
testproj /
name age message
file0.txt 2 hours ago resolved changes from br2
file1.txt 3 hours ago Commit 4.
file2.txt 5 hours ago First commit.
file3.txt 3 hours ago First commit to br1.
Click on a file to view its contents
Develop and upload new code from master
git branch br3
git checkout br3
echo "file5 created in br3" > file5.txt
git add file5.txt
git commit
git checkout master
git diff br3
diff --git a/file5.txt b/file5.txt
deleted file mode 100644
index c994a36..0000000
--- a/file5.txt
+++ /dev/null
@@ -1 +0,0 @@
-file5 created in br3
git merge br3
Updating db14e1a..1ec1d13
Fast-forward
file5.txt | 1 +
1 files changed, 1 insertions(+), 0 deletions(-)
create mode 100644 file5.txt
Confirm 1 commit ahead of github/master:
git status
# On branch master
# Your branch is ahead of 'github/master' by 1 commit.
#
nothing to commit (working directory clean)
git push github master
Counting objects: 4, done.
Delta compression using up to 2 threads.
Compressing objects: 100% (2/2), done.
Writing objects: 100% (3/3), 292 bytes, done.
Total 3 (delta 1), reused 0 (delta 0)
To git@github.com:sag/testproj.git
db14e1a..1ec1d13 master -> master
Confirm
git status
# On branch master
nothing to commit (working directory clean)
http://github.com-> sign in-> Repositories-> testproj-> tab Files-> refresh the list of files
See file5.txt
Develop and upload new code from an arbitrary branch
git branch br4
git checkout br4
echo "file6 created in br4" > file6.txt
git add file6.txt
git commit
git push github br4
Counting objects: 4, done.
Delta compression using up to 2 threads.
Compressing objects: 100% (2/2), done.
Writing objects: 100% (3/3), 292 bytes, done.
Total 3 (delta 1), reused 0 (delta 0)
To git@github.com:sag/testproj.git
* [new branch] br4 -> br4
Confirm
http://github.com-> sign in-> Repositories-> testproj-> tab Branches-> see the list of files
See file6.txt
Step 6 of 8. Simple Collaboration with an Untrusted Partner
aka Fork & Pull. Merge at github website
Prereqs
Untrusted partner:
has github account
username seep
has SSH access to git@github.com
discovers your project 'testproj'
decides to contribute
Fork repository at Github
Untrusted partner:
http://github.com-> sign in-> search and find username sag & repository testproj
click 'Fork' (tiny button in upper-right)
wait
New screen appears under untrusted partner account with repository 'testproj'
Confirm
Browse files at github, confirm content
Clone repository from Github to partner laptop
(Note I specify the name 'github', rather than default 'origin'.)
Untrusted partner:
git clone -o github git@github.com:seep/testproj.git testproj
Cloning into 'testproj'...
remote: Counting objects: 33, done.
remote: Compressing objects: 100% (16/16), done.
remote: Total 33 (delta 4), reused 33 (delta 4)
Receiving objects: 100% (33/33), done.
Resolving deltas: 100% (4/4), done.
Confirm
cd testproj
ls
file0.txt file1.txt file2.txt file3.txt file5.txt
Optional: Configure git locally
git config user.name seep
git config user.email seep@seep.com
Verify:
cat .git/config
Contribute
Untrusted partner:
git branch branch-a
git checkout branch-a
Switched to branch 'branch-a'
echo file1a > file1a.txt
git add file1a.txt
git commit -m "Added file1a.txt under branch-a"
[branch-a 5ce79c4] Added file1a.txt under branch-a
1 file changed, 1 insertion(+)
create mode 100644 file1a.txt
Upload contribution to github
Untrusted partner:
git push github branch-a
Counting objects: 4, done.
Delta compression using up to 2 threads.
Compressing objects: 100% (2/2), done.
Writing objects: 100% (3/3), 274 bytes, done.
Total 3 (delta 1), reused 0 (delta 0)
To git@github.com:seep/testproj.git
* [new branch] branch-a -> branch-a
Confirm
http://github.com-> sign in-> tab Branches-> branch-a-> see the list of files
See file1a.txt
Initiate pull request from laptop to github
Untrusted partner:
http://github.com-> sign in-> tab Branches-> branch-a
Click 'Pull Request'
Type message to owner in textbox
Please be so kind as to accept my humble contribution
Click 'Send pull request'
See request in list of pull requests, state 'open'
You:
Receive notification email from contributor
Sender: untrusted partner seep-ADE9848T7DKROEFORE9K6K43F @ reply.github.com
Subject: [testproj] Added file1a under branch-a (#1)
http://github.com-> sign in-> Pull Requests-> Public
See one pull request from contributor with message
Click the pull request
Review changes:
click tab discussion, exchange Q&A
click tab commits, review
click tab diffs, review
Accept contribution into branch master at github
click button Merge Pull Request-> Confirm
Accept contribution into local master from github
git pull
Updating 1ec1d13..81e9140
Fast-forward
file1a.txt | 1 +
1 files changed, 1 insertions(+), 0 deletions(-)
create mode 100644 file1a.txt
Delete forked repository
Untrusted partner:
Optional:
http://github.com-> sign in-> forked repo-> Admin-> Delete this repository-> Confirm
rm -rf testproj/
Step 7 of 8. Slightly More Complex Collaboration with an Untrusted Partner
aka Fork & Pull. Merge from your laptop.
Same as previous step. Untrusted partner forks repo, creates branch, checkout branch.
Modify an existing file
Untrusted partner
git branch branch-b
git checkout branch-b
Switched to branch 'branch-b'
echo "file1a modified by branch-b" >> file1a.txt
cat file1a.txt
file1a
file1a modified by branch-b
git add file1a.txt
git commit -m "file1a modified by branch-b"
Upload branch to github
Untrusted partner
git push github branch-b
Counting objects: 5, done.
Delta compression using up to 2 threads.
Compressing objects: 100% (2/2), done.
Writing objects: 100% (3/3), 294 bytes, done.
Total 3 (delta 1), reused 0 (delta 0)
To git@github.com:seep/testproj.git
* [new branch] branch-b -> branch-b
Confirm http://github.com-> sign in-> click forked repository testproj-> Branches
See branch-b and br4
Click branch-b-> Pull Request-> message "Please review branch-b."-> Send pull request
You
Receive email notification
http://github.com-> sign in-> Pull requests-> All requests-> See branch-b-> read message-> exchange Q&A
Replicate untrusted partner's remote branch to a local branch on your laptop
You
git checkout master
Switched to branch 'master'
git branch seep-branch-b
git checkout seep-branch-b
Switched to a new branch 'branch-b'
git remote add seep git@github.com:seep/testproj.git
Confirm
git remote -v
github git@github.com:sag/testproj.git (fetch)
github git@github.com:sag/testproj.git (push)
seep git@github.com:seep/testproj.git (fetch)
seep git@github.com:seep/testproj.git (push)
git fetch seep
remote: Counting objects: 5, done.
remote: Compressing objects: 100% (1/1), done.
remote: Total 3 (delta 1), reused 3 (delta 1)
Unpacking objects: 100% (3/3), done.
From github.com:seep/testproj
* [new branch] br4 -> seep/br4
* [new branch] branch-b -> seep/branch-b
* [new branch] master -> seep/master
git merge seep/branch-b
Updating 81e9140..b108f6f
Fast-forward
file1a.txt | 1 +
1 files changed, 1 insertions(+), 0 deletions(-)
Confirm
cat file1a.txt
file1a
file1a modified by branch-b
Exchange emails with contributor...
Accept revisions from contributor to your local branch
Untrusted partner
echo "file1a..." >> file1a.txt
git add file1a.txt
git commit -m "file1a modified again..."
git push github branch-b
You
git fetch seep
remote: Counting objects: 5, done.
remote: Compressing objects: 100% (2/2), done.
remote: Total 3 (delta 1), reused 3 (delta 1)
Unpacking objects: 100% (3/3), done.
From github.com:seep/testproj
a02a9d0..4aaf4fd branch-b -> seep/branch-b
git rebase seep/branch-b
First, rewinding head to replay your work on top of it...
Fast-forwarded seep-branch-b to seep/branch-b.
Confirm
cat file0.txt
file0
change in branch master and in branch br2
file0 modified by branch-b
file0 modified again by branch-b
Repeat
Also modify files in your own local branch, commit to local master, commit to github master
You
echo "file1a modified by seep-branch-b" >> file1a.txt
git add file1a.txt
git commit -m "file1a modified by seep-branch-b"
[seep-branch-b 3989062] file1a modified by seep-branch-b
1 files changed, 1 insertions(+), 0 deletions(-)
git checkout master
Switched to branch 'master'
git diff seep-branch-b
diff --git a/file1a.txt b/file1a.txt
index 2529696..a7c50fe 100644
--- a/file1a.txt
+++ b/file1a.txt
@@ -1,3 +1 @@
file1a
-file1a modified by branch-b
-file1a modified by seep-branch-b
git merge seep-branch-b
Updating 81e9140..3989062
Fast-forward
file1a.txt | 2 ++
1 files changed, 2 insertions(+), 0 deletions(-)
Confirm
cat file1a.txt
file1a
file1a modified by branch-b
file1a modified by seep-branch-b
git status
# On branch master
# Your branch is ahead of 'github/master' by 2 commits.
#
nothing to commit (working directory clean)
git push github master
Counting objects: 8, done.
Delta compression using up to 2 threads.
Compressing objects: 100% (5/5), done.
Writing objects: 100% (6/6), 566 bytes, done.
Total 6 (delta 2), reused 0 (delta 0)
To git@github.com:sag/testproj.git
81e9140..3989062 master -> master
git branch -d seep-branch-b
Deleted branch seep-branch-b (was 3989062).
Contributor fetches latest
Untrusted partner:
git checkout master
Switched to branch 'master'
Confirm
cat file1a.txt
file1a
git remote add sag git@github.com:sag/testproj.git
Confirm
git remote -v
github git@github.com:seep/testproj.git (fetch)
github git@github.com:seep/testproj.git (push)
sag git@github.com:sag/testproj.git (fetch)
sag git@github.com:sag/testproj.git (push)
git fetch sag
remote: Counting objects: 5, done.
remote: Compressing objects: 100% (3/3), done.
remote: Total 3 (delta 1), reused 2 (delta 0)
Unpacking objects: 100% (3/3), done.
From github.com:sag/testproj
* [new branch] br4 -> sag/br4
* [new branch] master -> sag/master
git rebase sag/master
First, rewinding head to replay your work on top of it...
Fast-forwarded master to sag/master.
Confirm
cat file1a.txt
file1a
file1a modified by branch-b
file1a modified by seep-branch-b
Optional 1: upload from local branch master to github fork
git push github master
Counting objects: 5, done.
Delta compression using up to 2 threads.
Compressing objects: 100% (3/3), done.
Writing objects: 100% (3/3), 304 bytes, done.
Total 3 (delta 1), reused 0 (delta 0)
To git@github.com:seep/testproj.git
81e9140..3989062 master -> master
Confirm
http://github.com-> sign in-> list of files-> see file1a.txt
Optional 2: delete branch at github
git push github --delete branch-b
To git@github.com:seep/testproj.git
- [deleted] branch-b
Confirm:
http://github.com-> sign in-> list of branches-> none
Optional 3: delete local branch
git branch -d branch-b
Deleted branch branch-b (was b108f6f)
Confirm
git branch
* master
Step 8 of 8. Collaboration with a Trusted Partner
aka Shared Repository
TBD - Watch this space...
References
Posting SSH keys to github: https://help.github.com/articles/generating-ssh-keys
Using SSH config file: http://nerderati.com/2011/03/simplify-your-life-with-an-ssh-config-file/
Create a repository at Github: https://help.github.com/articles/create-a-repo
Fork a repository at Github: https://help.github.com/articles/fork-a-repo
Using pull requests:
https://help.github.com/articles/using-pull-requests (see "Fetch and Merge")
http://effectif.com/git/applying-github-pull-requests
All about Git (verbose): http://git-scm.com/book
All about Git (terse): http://gitref.org/
Using shared repositories: http://toroid.org/ams/git-central-repo-howto
Git pull vs fetch:
http://stackoverflow.com/questions/292357/whats-the-difference-between-git-pull-and-git-fetch
http://longair.net/blog/2009/04/16/git-fetch-and-merge/
Deleting a repo:
https://help.github.com/articles/deleting-a-repo
http://stackoverflow.com/questions/2003505/how-do-i-delete-a-git-branch-both-locally-and-in-github
Adding multiple remotes:
http://gitref.org/remotes/ ("take contributions from someone elses repository")
More references:
http://www.sbf5.com/~cduan/technical/git/
http://www.vogella.com/articles/Git/article.html
Verbose details about git reset: http://git-scm.com/2011/07/11/reset.html
Team work procedures: http://scottchacon.com/2011/08/31/github-flow.html
Too complex:
http://www.gitguys.com/topics/tracking-branches-and-remote-tracking-branches/
Sunday, June 17, 2012
Using WEINRE to debug mobile javascript with IBM Worklight
WEINRE is an opensource tool designed to debug mobile javascript. It presents an interface similar to Web Instpector and Firebug. It lets you view console.log messages, change the DOM, etc. It is amazingly simple to use.
I recently started using IBM Worklight to build mobile apps. I was curious if I could use WEINRE with IBM Worklight. I ran a little test using the Hello Worklight tutorial. I confirmed they both work together.
Here is what I did...
Prereqs
I first set up IBM Worklight on my laptop, created the HelloWorklight project following the tutorials, and installed the resulting APK on my android phone.
Instrument the source code
I added a line of code to the head section of HelloWorklight.html. It points to the WEINRE debug server which I will start on my laptop. This single line of code does the magic of connecting to the WEINRE debug server.
<script src="http://192.168.1.6:8888/target/target-script-min.js#anonymous"></script>
I specified an explicit IP address, since my laptop has several IPs in use. I specified port 8888 since the default WEINRE port 8080 was in use by my Worklight server. You should choose IPs and ports which work for you.
Later on in my test, I also added a button to the body section of HelloWorklight.html
<button onclick="myLittleMethod()">Click me</button>
And added the little method to the head section which gets executed when the button is pressed. This code pops up an alert on the android screen, and then generates a console.log message which is readable at the WEINRE debug server.
<script type="text/javascript">
function myLittleMethod() {
alert("Hello Worklight");
console.log("Hello WEINRE too");
}
</script>
Start the WEINRE debug server
I started the WEINRE debug server from a command-line prompt on my laptop. I left this server running in the command-prompt. Be sure to specify the same IP and port you put in the javascript.
java -jar weinre.jar --boundHost 192.168.1.6 --httpPort 8888
WEINRE gave several messages which looked successful.
2012-06-15 15:07:40.021:INFO::jetty-7.x.y-SNAPSHOT
2012-06-15 15:07:40.065:INFO::Started SelectChannelConnector@192.168.1.6:8888
2012-06-15 15:07:40.065:INFO:weinre:HTTP server started at http://192.168.1.6:8888
Browse to the WEINRE debug server
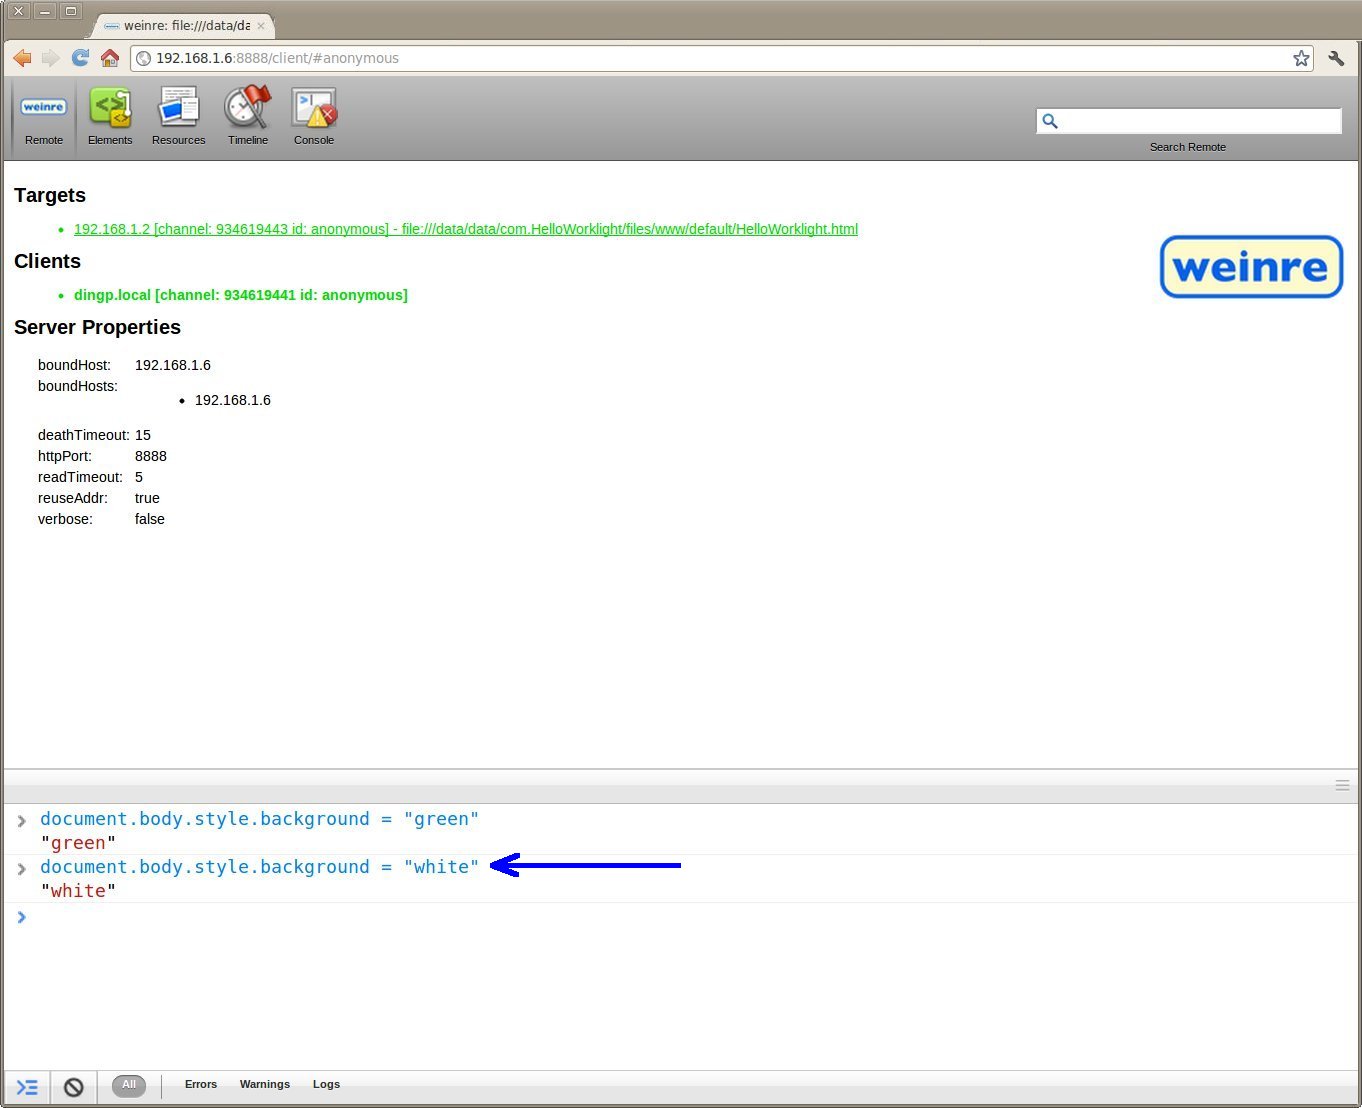
I aimed my Chrome browser at the WEINRE debug server, using the anonymous account which I specified in the javascript, and the same IP and port as when I started the WEINRE debug server.
http://192.168.1.6:8888/client/#anonymous

Start the mobile app
On my android phone, I started the HelloWorklight app.
Within a few seconds, the mobile javascript connected to the WEINRE debug server. It appeared as these two green lines:

Test changing the DOM
To show that WEINRE could change the DOM, I changed the background color by typing into the bottom of the WEINRE browser screen:

The background color of HelloWorklight immediately changed:

I changed the color again:

and the background color changed back.

Test console.log messages
After I got this working, I added code to present a button and to generate an alert and console.log messages.
 I pressed the button on the HelloWorklight mobile app. It popped up the expected alert.

As soon as I cleared the alert, the javascript generated a console log message which appeared on the WEINER browser screen.

Conclusion
Based on this little test, I conclude I can use WEINRE to debug mobile javascript, just as I did in the past. Yay.
References
WEINRE home (and binaries): http://people.apache.org/~pmuellr/weinre/
WEINRE docs: http://people.apache.org/~pmuellr/weinre/docs/latest/
IBM Worklight: https://www.ibm.com/developerworks/mobile/worklight.html
I recently started using IBM Worklight to build mobile apps. I was curious if I could use WEINRE with IBM Worklight. I ran a little test using the Hello Worklight tutorial. I confirmed they both work together.
Here is what I did...
Prereqs
I first set up IBM Worklight on my laptop, created the HelloWorklight project following the tutorials, and installed the resulting APK on my android phone.
Instrument the source code
I added a line of code to the head section of HelloWorklight.html. It points to the WEINRE debug server which I will start on my laptop. This single line of code does the magic of connecting to the WEINRE debug server.
<script src="http://192.168.1.6:8888/target/target-script-min.js#anonymous"></script>
I specified an explicit IP address, since my laptop has several IPs in use. I specified port 8888 since the default WEINRE port 8080 was in use by my Worklight server. You should choose IPs and ports which work for you.
Later on in my test, I also added a button to the body section of HelloWorklight.html
<button onclick="myLittleMethod()">Click me</button>
And added the little method to the head section which gets executed when the button is pressed. This code pops up an alert on the android screen, and then generates a console.log message which is readable at the WEINRE debug server.
<script type="text/javascript">
function myLittleMethod() {
alert("Hello Worklight");
console.log("Hello WEINRE too");
}
</script>
Start the WEINRE debug server
I started the WEINRE debug server from a command-line prompt on my laptop. I left this server running in the command-prompt. Be sure to specify the same IP and port you put in the javascript.
java -jar weinre.jar --boundHost 192.168.1.6 --httpPort 8888
WEINRE gave several messages which looked successful.
2012-06-15 15:07:40.021:INFO::jetty-7.x.y-SNAPSHOT
2012-06-15 15:07:40.065:INFO::Started SelectChannelConnector@192.168.1.6:8888
2012-06-15 15:07:40.065:INFO:weinre:HTTP server started at http://192.168.1.6:8888
Browse to the WEINRE debug server
I aimed my Chrome browser at the WEINRE debug server, using the anonymous account which I specified in the javascript, and the same IP and port as when I started the WEINRE debug server.
http://192.168.1.6:8888/client/#anonymous

Start the mobile app
On my android phone, I started the HelloWorklight app.
Within a few seconds, the mobile javascript connected to the WEINRE debug server. It appeared as these two green lines:

Test changing the DOM
To show that WEINRE could change the DOM, I changed the background color by typing into the bottom of the WEINRE browser screen:

The background color of HelloWorklight immediately changed:

I changed the color again:
and the background color changed back.

Test console.log messages
After I got this working, I added code to present a button and to generate an alert and console.log messages.


As soon as I cleared the alert, the javascript generated a console log message which appeared on the WEINER browser screen.

Conclusion
Based on this little test, I conclude I can use WEINRE to debug mobile javascript, just as I did in the past. Yay.
References
WEINRE home (and binaries): http://people.apache.org/~pmuellr/weinre/
WEINRE docs: http://people.apache.org/~pmuellr/weinre/docs/latest/
IBM Worklight: https://www.ibm.com/developerworks/mobile/worklight.html
Monday, March 26, 2012
What name is published as the 'Developer Name' in the Amazon Android Appstore?
The Amazon Android Appstore lists the name of the developer of an app in at least two places. Here is one place for the popular Angry Birds app:

And another place:

I am releasing an Android app to the Amazon Android Appstore. I don't want my real name to appear publicly, due to privacy concerns.
Question: Which field from my Amazon profile is published as the 'developer name' in the Amazon Android Appstore?
Answer: "Developer or Company"

You need to know this information BEFORE you create a new profile, because the field is immutable. That is, you can't change it after the profile has been created.
Of course, I couldn't find this information documented anywhere. I discovered it AFTER I created my new profile. Alas...
Lesson learned: Whether you want to be known by your real name, a nickname, or a fancy company name, "Developer or Company" is the place to say it.
Hope it's helpful.
Thursday, February 16, 2012
Testing Android User Interfaces with Robotium
Overview
Android provides a 'test project' framework and various tools for testing apps. Robotium is an opensource project which enhances these facilities. Robotium provides convenience and utility methods which simplify clicking buttons, accessing text fields, etc. Robotium hides the underlying syntax and procedures.
Tests can be run on emulators as well as real devices.
Tests can be started within eclipse as well as from a command-line.
Testcase methods can access localized message strings.
Setup
- Create the Android app to be tested (aka app-under-test).
- Create a basic Android Test Project associated with your app-under-test. Follow basic Android instructions:
http://developer.android.com/resources/tutorials/testing/helloandroid_test.html
- Verify it runs.
From Eclipse package explorer, right-click the test project-> Run As-> Android JUnit Test.
- Fetch the Robotium jar file:
http://code.google.com/p/robotium/ -> Downloads -> robotium-solo-3.1.jar (or later)
Optional: Fetch the javadoc.
- Add the Robotium jar file to the test project 'libs' directory
From Eclipse-> right click test project-> Properties-> Java build path-> Add external jars-> point to jar.
- In your testcase class, import the Robotium Solo class and define a reference to a Solo object:
import com.jayway.android.robotium.solo.Solo;
private Solo mSolo;
Fix your dependencies and get your testcase class to compile.
- Instantiate a Solo object in one of your testcase methods:
// Instantiate a new Solo object.
mSolo = new Solo(getInstrumentation(), getActivity());
Verify it runs. You are now ready to make use of Robotium...
Using Robotium
Study the methods available in class Solo. Either read the javadoc or browse the source:
https://github.com/jayway/robotium/tree/master/robotium-solo/src/main/java/com/jayway/android/robotium/solo
- Access widgets in your app-under-test using Solo. Examples:
-- My app-under-test contains one ToggleButton. Since there is only one, I can use the index '0' to query this ToggleButton:
// Query whether the button is checked.
boolean checked = mSolo.isToggleButtonChecked(0)
-- My ToggleButton text is defined as 'OFF' and 'ON'. To click the ToggleButton, I use the name:
// Click the OFF button to ON.
mSolo.clickOnToggleButton("OFF");
Note that the 'name' of a ToggleButton changes from 'OFF' to 'ON' depending upon its state. To click it again when it is on, issue the following:
// Click the ON button to OFF.
mSolo.clickOnToggleButton("ON");
-- My app also has one TextView which displays various messages. I can use Robotium Solo to query if a message is visible:
// Query whether the message is displayed.
boolean found = mSolo.searchText("green apples");
-- Robotium also has a set of methods named 'waitForText' with various parameters. I look forward to using these.
Internationalization
Rich apps display text messages in various languages. Testcases which search for text strings must be able to access the localized string. The basic Android test project supports this, and it works with Robotium as well.
I added several strings to be translated in my app-under-test. From res/values/strings.xml:
<string name="on">ON</string>
<string name="off">OFF</string>
<string name="green_apples">green apples</string>
I internationalized my toggle button to use these values:
<ToggleButton
...
android:textOn="@string/on"
android:textOff="@string/off" >
</ToggleButton>
Then within the test project...
// Get localized strings.
int idOff = com.example.app-under-test-package-name.R.string.off;
String off = getActivity().getResources().getString(idOff);
// Click the OFF button to ON.
mSolo.clickOnToggleButton(off);
Similarly for text fields...
int idGreenApples = com.example.app-under-test-package-name.R.string.green_apples;
String greenApples = getActivity().getResources().getString(idGreenApples);
// Query whether the message is displayed.
boolean found = mSolo.searchText(greenApples);
Execution
There are two ways to invoke tests...
From eclipse package explorer, right-click the test project-> Run As-> Android JUnit Test. Eclipse first installs the app-under-test APK and the testcase APK. Then it switches to the familiar JUnit view which shows a list of tests as they run, along with a progress bar.
From a command-line, issue ADB commands to install both APKs, then issue an ADB command to start the testcase app (specifying your testcase package name and the Android InstrumentationTestRunner). Example:
# Install the app-under-test.
adb install -r app-under-test.apk
# Install the test app.
adb install -r testcases.apk
# Start the test app:
adb shell am instrument -w com.example.test-package-name/android.test.InstrumentationTestRunner
In both cases, you can watch the tests run on your emulator or real device.
Execution on multiple devices
If you have several real devices attached to your computer via USB cable, you can run all the tests in parallel, from different command-line windows (or through fancy scripting). To do this, you must specify the device ID. First query the list of devices (obfuscated results):
adb devices
List of devices attached
S84KD9G0D0F4 device
P40D9GKKRKD8 device
Then target each ADB command to a specific device. Example:
adb -s S84KD9G0D0F4 install -r app-under-test.apk
Summary
Robotium provides a large set of convenience methods for accessing widgets and text fields, which makes your testcases smaller, simpler, and easier to understand. Very nice. Study the methods and make use of them.
References:
Android Test Guide: http://developer.android.com/guide/topics/testing/testing_android.html
Robotium: http://robotium.org
Tutorials: http://lmgtfy.com/?q=robotium+tutorial
Subscribe to:
Posts (Atom)